Tuesday, January 1, 2013
Time to say Goodbye
Dear my bloggy friends,
It's hard to believe another new year has come...
It's also almost three years since I first joined blogging community as well as the crafting world. Crochet and knitting were something too new to me three years ago. This blog marked the beginning of me with crochet, and with knitting later on. This blog were not only my little corner where I learned and shared all the love of crafting to everyone, it took note from my first improvement to how I really got into these crafts. Blogging created a wonderful opportunity for me to meet a lot of wonderful people, to have a lot of friends, close friends that I will never forget.
So, it's absolutely not easy, I know, but it's time to say goodbye to you all. I have been away from blogging for a while, I even cannot remember when I last logged on to my blog. I told myself I would be back when all is settled, but work, family and many other things have taken over my life and they are things I have to put all my heart and energy in. The motivation for my blog went down and the last few months it was hard to fill my blog with an inspirational post. Further more, I would enjoy the joy of creating rather than I have to think of what I will blog about...
Thank you very much for those who sent messages during my absence asking if I am OK and that I have been missed. Just let you know how I was happy and felt warm in my heart reading such kind words. I am grateful for the great inspiration and encouragement from all of you so far. That helped and meant a lot to me. Thank you very much for the wonderful time we had throughout the last few years, that made my blogging journey happy and enjoyable. It was all fun, wasn't it...
Not sure if I will start another blog in the future, but at this moment please allow me to turn off comment function on this post for a couple of weeks, I really need a break and may not be able to get back to you as quickly as I want to. To my new followers, thank you for your visit and I do apologize for the silence during the time. I hope you are able to find what you are looking for.
From the bottom of my heart, THANK YOU.
Hope your 2013 will be a wonderful year of creation. Wishing everyone good health, happiness and success.
Goodbye.
Hugs to all, LS xxx
Tuesday, October 30, 2012
Sunday Morning Sweater
Hello everyone!
Thank you so much for your lovely words on my knitted lilac top. My passion for knitting is growing and I'm so happy to hear how people around think or feel about my "achievement" in knitting - yes, whenever a knitted project is done, it's such an achievement to me! So, thank you!
See what I'm so excited to show you today - my Sunday Morning Sweater (just simply I finished it in a beautiful morning of a beautiful Sunday)! You can guess how much I'm happy with the result!

I have made three sweaters so far and this one is my best loved ever! It looks just too cute and stylish, doesn't it!!!

I found the pattern on Pickles and I just loved it. It's also available on Ravelry. The pattern (for size XS) calls for 200gr cotton yarn, but not sure how mine would turn out so I used 2 balls of Lion Brand Cotton Ease in my stash for the first try. Actually 1 ball I ripped out from a hat which I rarely wore.

I was worried I would run out of yarn as the yardage of my yarn is different from Pickles', not to mention it was not a full skein after being ripped out from the hat. I decided to "insert" some rounds/rows with the pink Lion Brand Wool Ease leftover instead of buying one more skein of cotton yarn. So happy with my decision: pictured is how much yarn leftover after my sweater was all done! Just about 2 meters! Good way to clear my stash!!! :)

Again, this sweater fits me wonderfully! I pretty much love the pattern, it's very easy and fast to knit. The only thing that I was struggling with is the Kitchener stitch to join front and back side of the shoulders together. I had to unravel and try again, and again, as if I could never go right with this technique, until I found this wonderful video. I digged out Youtube and watched many videos about Kitchener stitch during the time, but this one is really a big help to me! Things turned to so easy and so fun with it!

I love most of the patterns from Pickles. They are almost seemless, knitted in the round, simple and very easy to knit. They are also very beautiful! This pattern is knitted very quickly on size 10 needles, and the pink lines by chance make it sweeter!

I will make this sweater again, for sure. This is just a try to use up some leftover scrap yarns but it came out amazingly. The color is so sweet, too!! How many times did I tell you I love it?!!! :)

Thank you for stopping by, I hope you all are having a beautiful week!
Take care and all the best,
~ Hugs, LS xxxxx
Sunday, October 28, 2012
Knitted Lilac Girly Top
I finished this top a couple of weeks ago, but have still not posted about it yet. Sweetie has been having a neck pain so he couldn't take photo for me. It had been put it away until this morning...
This morning was such a beautiful one, with sunshine and some light winds, and Sweetie is getting better. He helped to take some pictures of me wearing it... It looks quite nice and I'm pretty much pleased with it!

I found the pattern, Girly Top on Ravelry when I was looking for a top to knit. It's so simple and very easy to knit. Love this pattern, it's knitted in the round, from bottom up, all just in one piece! I think it's perfect for any beginners! Here is how it looks when lying flat:

Using Patons Brilliant yarn for this top, I followed the pattern for size S but used larger needles (4.0mm for ribbing and 4.5mm for the rest). I liked everything about this top pattern, but millions of stockinette stitches just took me FOREVER to finish! Finally done (phew!). So happy it fits me well!

It's so hard to take a good photo of the top with this yarn, a metallic yarn for a sparkle look. One thing I liked best about the yarn is it's smooth and easily fits, I almost didn't block though, just did some light sprays and let it dry naturally. I pretty like the yoke...

... and another look from the back - actually it's the same for both sides :).

I'm wearing it tomorrow, hope my colleagues like it. They saw me knitting it during a company trip! :)
Thank you so much for popping in. Hope you are having a wonderful weekend!
Take care and see you!
Hugs, LS x
Thursday, October 25, 2012
Sockhead hat KAL and some new Yarns
I'm choosing yarn for another sockhead hat to join the sockhead hat KAL hosted by Stitchy Mc Floss as an encouragement to dearest Pammy Sue. Pammy Sue at Scotty's Place teaches herself to knit and she wanted to knit a sockhead hat from the pattern I used to make my "Fancy hat" previously.
Maybe I will use the lightweight yarn leftover from a knitted top (will take photos to show you very shortly!) for matching. If you do knit, just pick up some yarn and let her know you are knitting a sockhead hat with her, too! Even if you don't knit, why don't you take this chance to give it a try together with Pammy Sue! We knit and learn together! This is going to be a lovely encouragement to her with lots of fun! :)
~ ~ ~ ~ ~ ~ ~ ~
Well, just to share with you some new yarn I bought when Herrschners.com was having late summer yarn sale and I was so happy to get some more beautiful yarns to my stash. They also have weekly yarn sale and needlework sale as well.
Caron Simply Soft Collection 3oz balls in Aqua mist, I so much love the yarn and the color is so much sweeter than pictured on the sites. I've been thinking of an aqua sweater!

And these 6oz balls Caron Simply Soft are still being sold there at normal price, I picked some balls in Lavender, Autumn Red and Persimmon. A dear friend of mine chooses Caron Simply Soft for most of her projects and I'm inspired by her love for this yarn!

I also want to try different yarn brands. Department 71 in Strawberry, wool blend, so soft and so beautiful! I took 4 skeins hoping it's enough for a sweater or a cardigan. Gosh, I'm obsessed with knitting and Ravelry now, lots of patterns of sweater, cardigan, top, pullover,... they are overwhelming my mind that I don't know which one should be made first! :)

The yarn with a little twist in it, will create a beautiful fabric. This can be good for baby projects as well due to the softness and the darling color...

This is one of my favorite colors, green! Lighthouse Cape Cod yarn, I've been thinking a lot about what to make with this beautiful yarn...

I love the tweedy look of it! Still not yet decided what it will be for, but surely must be something wearable! So happy I can knit! :)

And here is Reynolds Playtime yarn in Cream camel. This yarn has been discontinued and was on sale as well. I should have taken 10 balls instead of 8 to ease my mind from the worry of running out of yarn, will look for a pattern called for the same yardage anyway.

The yarn is not too soft, but it's beautiful, wool blend and lightweight. It is described: "Reynolds Play Time is a perfect kid yarn – if something is dropped on it, you can put it in the washer, toss it in the dryer, and it’s good as new". Sounds interesting! Maybe I should keep this for my kids when I have? :)

I cannot help myself taking home more yarn. Wish I could have a craft room. My stash is now full of yarn, including some I bought from local store, a lot actually, not to mention to crochet thread! A friend asked me once, "when do you expect you will use up all these yarns?". Honestly I have no idea... Just keep adding to my stash faster than I can use from it. I'm crazy about yarn, am I??? But I'm trying, so much, to attempt to keep it under control. Maybe one of my resolutions next year is "not to buy more yarn"! :)
Thank you so much for stopping by...
Wishing you a happy rest of the week!
~ Till next time, LS
Sunday, October 21, 2012
Fancy sockhead hat
I didn't want to put half a ball of yarn left from the fancy "sea-foam" scarf back to my stash, so I looked for a matching hat pattern. Lucky me I found a very lovely pattern on Ravelry named "Sockhead hat".

This is the first time I heard about "sockhead" and found it's so interesting to try. It came out pretty lovely!

My yarn is a medium weight, heavier than what is called for - a light weight sock yarn, so after checking my gauge I decided to cast on less stitches: only 80 stitches on 5.0mm circular needles. My work was done so quickly with these much fewer number of stitches!


... and I especially love the slouch!

Even how it looks when lying flat is also fun! If this is not what I made, I would hardly believe it is a hat!

Thank you so much for your time, wishing everyone a wonderful weekend!
Hugs, LS x
Thursday, October 18, 2012
Fancy lacy scarf
Hello there! How is everyone doing? I hope you all are doing well...
I hardly believe it's been over a month since I did a blog post, just feel it's been ages! I have not been blogging, either visiting blogs or responding your comments during the time... Please accept my apologies for the silence. Life has been so messy lately, so many things have happened that kept me too busy to update my blog as well kept me away from blogland.
I would like to send a huge thank you to you all, my bloggy friends, who have still been visiting, leaving kind messages to ask if I am OK or just simply stopping by to say Hello... Just let you know how much I do appreciate that... I would also like to thank you very much to my new followers, I'm so happy you find my blog somehow interesting and keep following it. Please give me some time to visit you back and enjoy your creations... It may be a bit late, I know, but surely I will.
Well, I finished this scarf last month but have been waiting for a while to post it...

The scarf is from a very easy and popular drop stitch pattern, named "seafoam". Lace scarf is one of my favorites, mainly because of the "not so cold" weather where I live, so when I first saw this pattern in my knitting book, I told myself I must give it a go. If you have not yet tried, it's mindless knitting and really fun to make!

A closer look at the sea-foam stitches...

When I uploaded the scarf to my projects on Ravelry, I found there's another pattern available, and it's completely the same as the pattern in my book, even has the same name, "seafoam". "Seafoam scarf" on Ravelry - in case you wonder.

I used a Bernat big ball (10oz - 300gr) for the scarf. This yarn is really nice to work with, it's beautiful and softer than some other types of Bernat worsted. I so much love it. The loveliest part of this yarn is you don't have to join new yarn during the work, one ball makes it all! After this scarf I still have a half a ball left so I'm looking for a hat pattern to match with.

I have made several scarfs so far, but this is the first one I made for myself. I love it. I can imagine I'm wearing it, when my sweetie and I are enjoying a walk, on a cool autumn evening... :)

Thank you so much for stopping by - I'm so glad to see you again!
Wishing you all a wonderful day.
Lots of love,
LS xx
Tuesday, September 11, 2012
Crochet Jar Cover and a Lovely Award
Hello friends, thank you so so much for your words of encouragement on my first sweater! I really love reading them and just let you know how much you have warmed my heart. I do appreciate!!
I made this jar cover last Sunday morning, I just felt quite lazy and wanted to make something small and interesting to "refresh" my mind while working on my other time consuming projects...


One more thing I would want to share, I received a lovely award from a lovely bloggie friend when I was on vacation. Yufang at Hollywood Cerise blog passed this award on to me and I was so happy! Thank you so much, lady for thinking of me, it's such an honor! If you haven't checked out her blog yet, she is AWESOME!

I made this jar cover last Sunday morning, I just felt quite lazy and wanted to make something small and interesting to "refresh" my mind while working on my other time consuming projects...

I used 2 strands of light weight cotton and didn't prepare the order of colors first, they were chosen randomly. Doesn't it look lovely? I put my bamboo needles in this jar for a while and now it has a new shirt!

I had a lot of fun making it, and this cutie just made my Sunday! :)

One more thing I would want to share, I received a lovely award from a lovely bloggie friend when I was on vacation. Yufang at Hollywood Cerise blog passed this award on to me and I was so happy! Thank you so much, lady for thinking of me, it's such an honor! If you haven't checked out her blog yet, she is AWESOME!

Thank you so much for stopping by!
Wishing everyone a great week ahead!
Hugs, LS xxxxx
Thursday, September 6, 2012
~ My first sweater!
Hello there!! How are you all doing?
It's been a while and I'm sorry for the silence, I just got back from a vacation and I'm so happy to be back to blog land. Thank you so much for your visit and kind comments during the time, that really warms my heart. Hope you had a great time. For me, I know I had!
Well, you know what I took with me on the vacation, of course it must be something crocheting/knitting! I picked out a WIP sweater to work on the go, tried every moment I could on this project, and when I was home, it was almost finished! I just needed to work on the finishing and you know how excited I was to get it all done and blocked and pictured to show you! My very first sweater! Yay!!!

When I found this pattern at Pickles, I couldn't wait to give it a try! This is the first time I tried to knit a sweater so honestly I was not expecting it would fit me perfectly like this! You can guess how much thrilled I am! I am wearing a sweater I knitted myself!

Name of the pattern is "Norwegian Summer Sweater", but for such a tropical country like Vietnam it's obviously not for summer at all! I so much love the yoke, how about you? :)


I got a small problem when blocking this however. After checking some instructions on Internet about blocking, I decided to block with spraying method. Everything should have been going well if my silly hand then hadn't reached a hot iron and put on the sweater (as a try with hoping it would become smoother): a little part of the fabric got too stretchy and the stitches there got so loose! Fortunately I stopped using the iron right away and the damaged area is just small so it's hard to realize. Anyway it's an experience sometimes we have to pay for. I will NEVER use a hot iron on knitted fabric again! I turned to wet blocking and it looked so pretty after getting completely dry. Lay on desk:

... and on me! I can't wait until the winter comes to wear this (well, winter here lasts only a few days, though!)

It's been a while and I'm sorry for the silence, I just got back from a vacation and I'm so happy to be back to blog land. Thank you so much for your visit and kind comments during the time, that really warms my heart. Hope you had a great time. For me, I know I had!
Well, you know what I took with me on the vacation, of course it must be something crocheting/knitting! I picked out a WIP sweater to work on the go, tried every moment I could on this project, and when I was home, it was almost finished! I just needed to work on the finishing and you know how excited I was to get it all done and blocked and pictured to show you! My very first sweater! Yay!!!

When I found this pattern at Pickles, I couldn't wait to give it a try! This is the first time I tried to knit a sweater so honestly I was not expecting it would fit me perfectly like this! You can guess how much thrilled I am! I am wearing a sweater I knitted myself!

Name of the pattern is "Norwegian Summer Sweater", but for such a tropical country like Vietnam it's obviously not for summer at all! I so much love the yoke, how about you? :)

Another view from the arm:
This sweater pattern is knitted bottom-up, very quick and easy to make, perfect project for even beginners (like me). For this first try I used the yarn available in my stash, and also modified a bit on the original pattern for the bottom and the yoke (as I just don't like the curl of stk. stitches).
- Yarn: Bernat Super Value: 1 skein in Forest Green and about 0.25 skein in Magenta.
- Needles: Circular 32": 5mm for the ribbing and 6mm for the rest to get correct gauge.
- Modifications: - Bottom: Made 6 rounds of ribbing instead of stockinette.
- Yoke: Added 6 rounds of ribbing.
A closer look at the yoke I'm just in love with:

I got a small problem when blocking this however. After checking some instructions on Internet about blocking, I decided to block with spraying method. Everything should have been going well if my silly hand then hadn't reached a hot iron and put on the sweater (as a try with hoping it would become smoother): a little part of the fabric got too stretchy and the stitches there got so loose! Fortunately I stopped using the iron right away and the damaged area is just small so it's hard to realize. Anyway it's an experience sometimes we have to pay for. I will NEVER use a hot iron on knitted fabric again! I turned to wet blocking and it looked so pretty after getting completely dry. Lay on desk:

... and on me! I can't wait until the winter comes to wear this (well, winter here lasts only a few days, though!)

Thank you so much for stopping by and spending your time reading my post. I'm off to check yours out - my inspirations always!!
~ Wishing everyone a great day ♥
Hugs, LS
P.S. I have added the link to the pattern for the bolero I showed on my last post. Hope you can find something useful there.
~ Wishing everyone a great day ♥
Hugs, LS
P.S. I have added the link to the pattern for the bolero I showed on my last post. Hope you can find something useful there.
Tuesday, August 21, 2012
The first Bolero I ♥ to wear!
I always wanted to have a crocheted bolero to wear and tried to make a couple of things wearable before, but this is the FIRST one I can wear comfortably and I really love it! It was done over the weekend, you know how excited I was working on the finishings! It came out much much more beautiful than I expected!
Actually I started to work on this bolero several months ago but then I just kept getting distracted by many other projects so it had been in my WIP's bag for a while, until I took it out last week and tried to get it done.

In case you are wondering, I made this bolero using a pattern I by chance found on Picasa, in chart form. I will soon upload the pattern to share you all when I find out where it's hiding in my computer - I just printed it out to follow the instructions and cannot remember what folder I put it in - but it must be somewhere within this small machine!
- Thread: DMC cotton thread No. 10 (1 ball is enough for the whole body, a little of the second ball is mainly for joining and making the borders).
- Crochet hook size: 1.8mm
Don't you just love these lovely fronts?

And a close look at the stitches... It's so soft and the creamy color is just so sweet enough for me to look at it, hold it, and feel it all the weekend!

I love every detail of the bolero, but the most wonderful thing is it fits me sooooooo well, just like it's just for me! See how it looks on me - sorry for the "model"! :)

A look from the back... Surely my tank tops are all ready and happy to go with it!

Thank you so much for stopping by!
Wishing you all a beautiful rest of the week!
~ See you soon ♥
UPDATE on Sep 9, 2012:
Here is the link to the pattern on Picasa.
Note: I added 7 rows more for the lower body parts and 3 more rows on the upper parts (as seems the cotton 10 is quite thinner than the one used in pattern).
UPDATE on Sep 9, 2012:
Here is the link to the pattern on Picasa.
Note: I added 7 rows more for the lower body parts and 3 more rows on the upper parts (as seems the cotton 10 is quite thinner than the one used in pattern).
Monday, August 13, 2012
~ Lovely goodies and an award ~
Hello all, how are you doing? I hope you all had a great weekend and your new week ahead will be a beautiful one!
It's been over a week since my last post, sorry for the silence, work has been quite busy lately! Thank you so much for all your kind comments, your messages, your words of encouragement really made my day!
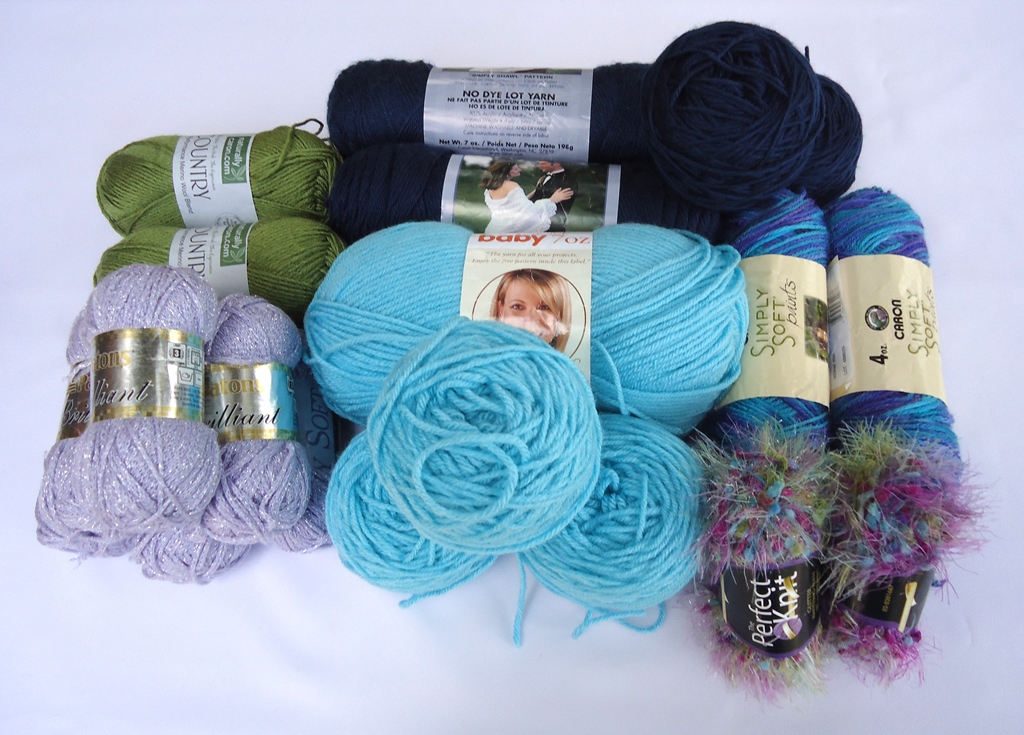
Well, not much for today post, I just would want to share with you some lovely goodies I bought from a lovely lady on Ravelry last week. She has some beautiful yarn for sale there, I checked out her stash and picked these beauties out:
Two balls of Vanna's Choice Baby, Aqua, one is wound into smaller balls.

Caron Simply Soft in Country dark blue. I see some bloggy friends using this type of yarn very often for their projects and I would want to try also, but it's not available at my local craft store here, so I took all three balls and love it!!

Caron Simply Soft Paints, also very soft and has a lovely variegated colors - Oceana.

Naturally Caron Country, in my favorite color... Soon I will find something beautiful to make with this lovely yarn!

And these Paton's Brilliant in lilac are just so soft and beautiful. This type of yarn has been discontinued, there were only 6 balls left in her stash so I took all. I've been thinking of knitting a top with these, and I'm still looking for a pattern to try!

I've never used any kind of glitter yarn so far, but it looks just cute so I took 2 balls, this can be something fun for my baby projects... ;)

The package arrived quite fast and here is all the yarns I have bought from her:
Look at the picture below, except a set of DPNs size 3 I also bought in the same order, all the rest are included in my package for free! Knitting needles - used and new, 11 pairs in total and a pair of Takumi circular needles together with some stitch holders - she offered them all for free as I was buying her yarns!

Other than that, below is some lovely stuff she included, a small ball of Simply Soft paints in rose garden and some bows, flowers,.. she made for embellishment and gifted to me as well. How nice!


And, one more thing to share is, I have received this "Liebster Award" from Miss Beena Stephy over at Beena's Creations. Thank you very much, my friend, for thinking of me and has passed this award on to me, I'm so honored!

I just googled the word "Liebster" and so fun to know it's German and means "Dearest", or "Beloved"! Go check out Beena's "Dearest" blog, her embroidery is amazing!!!
Thank you everyone for stopping by, wishing your days are all gorgeous!
Take care and best wishes ~
Subscribe to:
Posts (Atom)


.jpeg)


.JPG)


.jpg)


.jpg)


.HEIC)


.JPG)